I deal with a number of older bits of hardware on my test bench, and
to that end I have a "testbench" computer - an old P4 system that's
barebones on my desk. Into that I plug in anything I want to test out
(as long as it's not too modern).
Because of the different types of things I try on there I often need to use different operating systems - DOS, Windows 95/98/2000, even Linux. Traditionally I have had an IDE to SD card adapter connected up and I have a collection of SD cards, each with a different operating system on it. However I can never find my little pouch of SD cards when I need it.
So I have been thinking to myself for a while now: "You know, this board has an ethernet port built in, with PXE network booting. What could be fun would be to try and get it network booting some older operating systems."
I've already had it PXE booting memtest86+ for testing some DIMMs, which was fine, but failed to get it to do much more. I tried Linux, but gave up when I found I was going to have to construct my own initrd with NFS root support, which just seemed a pain, so never bothered. However I now have my NAS system set up and running with some big disks and ZFS, so thought that maybe iSCSI might be a way forward.
So... I did. And here's how.
The sequence is pretty straightforward really, but it took quite a bit of googling around and experimentation to bring it all together from disparate howtos and tutorials on the different subjects:
Create a disk image to use as your virtual hard drive
Configure the NAS system as an iSCSI target
Set up the disk image on iSCSI
Configure a DHCP server with PXE booting
Set up TFTP to share the iPXE boot image
Create an iPXE boot script to mount the iSCSI target and boot from it
Use QEMU to install DOS into the iSCSI target
Boot the testbench and hope
That does seem like quite a complex set of steps, sure, but some aren't really that complex (some are, though), but I'll take you step by step through each one covering all the caveats and pitfalls I found with them.
1. Create a disk image to use as your virtual hard drive
Now I'm using ZFS on my NAS so it makes sense for me to use a ZVOL for my backing store. You don't have to - you could use a raw file if you like, or a QEMU qcow2 file if you're feeling clever.
The biggest pitfall I came across here, which only became apparent towards the latter stages of this endeavor, is the size of the disk image. DOS can handle up to something like 8GB disks with partitions of up to 2GB, so you'd think "Right, let's start with a 2GB disk" or something like that. But that won't work. DOS can see 8GB disks, sure, but only through a translation layer provided by the BIOS. Without that translation layer the biggest disk DOS can see is 504MB. And guess what? That translation layer doesn't appear to be provided by iPXE on its iSCSI mounts. So the biggest disk image you can use is 504MB. That's 1024 cylinders × 16 heads × 63 sectors per track × 512 bytes per sector. Or 1024 × 16 × 63 × 512 528,482,304 bytes. If you want to use a simple file as your backing store that's the number of bytes it must be to be the biggest disk you can get. Of course, you can use smaller, so size it appropriately to your needs, sticking to reasonable CHS values and a 512 byte sector size.
For my needs I just used a ZVOL:
sudo zfs create -V 504M data/dos
You could create your file with truncate:
truncate --size 504M /path/to/dos.img
I briefly mentioned using a QEMU qcow2 file earlier, but I won't tell you how, since I haven't actually investigated it. But the theory is simple: create it using qemu-img, attach it to a block device with qemu-nbd and then use that block device as your iSCSI backing store, just as you would with a zvol device.
So, next on to....
2. Configure the NAS system as an iSCSI target
This is actually simpler than you would think. iSCSI is built in to the kernel already, and all you need to do is install the helper tools. The critical one is one called "targetcli" which is what you use to configure everything. I use Arch as my Linux distribution of choice, so only know how to install the software for that, though it should be similar on Ubuntu or Fedora, etc - you just need to find the right packages to install. On Arch there's three packages you need to install:
targetcli-fb
python-rtslib-fb
python-configshell-fb
There's a bunch of prerequisites for those of course, but if you're an Arch user then that's nothing new to you. But for other distros a little bit of searching may be in order to find your equivalent package names.
Once those are installed it's a simple as starting the target service:
sudo systemctl enable target
sudo systemctl start target
Now comes the real fun:
3. Set up the disk image on iSCSI
Everything now is done through targetcli, which you will of course need to run as root.
sudo targetcli
targetcli shell version 2.1.54
Copyright 2011-2013 by Datera, Inc and others.
For help on commands, type 'help'.
/> _
Now targetcli allows you to navigate your iSCSI configuration in a filesystem-like manner, with ls and cd to display things and traverse the tree. In the top level there are two important subtrees - backstores, which contains your disk images, and iscsi which manages the mapping of those images to iSCSI initiators. We start with the backstores section to import our disk image. I'm using a block device for my disk image, so I go into the backstores/block subtree. If you're using a file you will want to go into the backstores/fileio subtree, but everything else should be the same.
/> cd backstores/block
/backstores/block> _
You notice the prompt changes to show where you are, so you can't get lost. Now to create the actual disk image connection. It's very simple:
/backstores/block> create dos /dev/zvol/data/dos
Created block storage object dos using /dev/zvol/data/dos.
/backstores/block> _
And that's it - it's imported. The name of the backstore is dos and it's connected to the zvol block device. For files just use the full path to the file you created.
Now on to the iSCSI connection side of things. Again, this is pretty simple. Start by going into the /iscsi subtree:
/backstores/block> cd /iscsi
/iscsi> _
Now you need to create the iSCSI Qualified Name (IQN) for this server. You can use a default randomly generated one, but it's nasty, so I like to define my own which I can remember and subsequently type in. So:
/iscsi> create iqn.2023-02.uk.co.majenko.nas
Created target iqn.2023-02.uk.co.majenko.nas.
Created TPG 1.
Global pref auto_add_default_portal=true
Created default portal listening on all IPs (0.0.0.0), port 3260.
/iscsi> _
The general form of an IQN is iqn.<year>-<month>.<reversed-hostname>[:serial]
If you want to run multiple targets on the same system with the same IQN adding a :serial to the end to make each unique can be useful, but I don't intend to be that complex with my setup.
That command, though, configured most of the iSCSI connection for us.
It hasn't sorted out who can connect, though, and that is the next
step. We need to set up an Access Control List (ACL) to allow access to a
specific initiator to specific disk images mapped as different Logical
Unit Numbers (LUNs). For that, we first create the LUN:
/iscsi> cd /iscsi/iqn.2023-02.uk.co.majenko.nas/tpg1/luns
/iscsi/iqn.20...nas/tpg1/luns> create /backstores/block/dos
Created LUN 0.
/iscsi/iqn.20...nas/tpg1/luns> _
Then we create an ACL granting access to it:
/iscsi/iqn.20...nas/tpg1/luns> cd ../acls
/iscsi/iqn.20...nas/tpg1/acls> create iqn.2023-02.uk.co.majenko.ipxe
Created Node ACL for iqn.2023-02.uk.co.majenko.ipxe
Created mapped LUN 0.
/iscsi/iqn.20...nas/tpg1/acls> _
I made up my own memorable initiator IQN to allow connections from there, so choose something that describes your setup, not mine.
No one can connect yet though. For simplicity I'm just going to turn off authentication, although you can use password authentication if you need to, but I don't yet know how to use that in iPXE, so leave authentication off for the moment:
/iscsi/iqn.20...nas/tpg1/luns> cd ../acls
/iscsi/iqn.20...nas/tpg1/acls> create iqn.2023-02.uk.co.majenko.ipxe
Created Node ACL for iqn.2023-02.uk.co.majenko.ipxe
Created mapped LUN 0.
/iscsi/iqn.20...nas/tpg1/acls> _
And that should be it. All that's left is to save the configuration and exit:
/iscsi/iqn.20....majenko.ipxe> cd /
/> saveconfig
Last 10 configs saved in /etc/target/backup/.
Configuration saved to /etc/target/saveconfig.json
/> exit
Now to the networking... getting PXE and iPXE going:
4. Configure a DHCP server with PXE booting
Setting up a DHCP server can be a bit of a black art. If you're relying on your ISP's router to dole out IP addresses you'll be out of luck here. You need to be running your own DHCP server. I have my own separate network segment on my workbench with DHCP provided by a Raspberry Pi (which I am soon going to move over to my new NAS and decommission the Pi once all services are moved over, but that's another story). On that Pi I run the "ISC DHCP server" dhcpd. If you use a different one then instructions will of course vary. I can't help you with those, I'm afraid, but I'm sure the information given here will help you to fathom it out.
For ISC dhcpd, though, the important things in the config file are, at the global level:
allow booting;
allow bootp;
option client-architecture code 93 = unsigned integer 16;
Then define an entry for your desired target machine:
host testbench {
        hardware ethernet 00:13:8f:17:aa:59;
        fixed-address 192.168.130.151;
        option host-name "testbench";

        if exists user-class and option user-class = "iPXE" {
                filename "http://192.168.130.1/pxe/boot_script.php";
        } elsif option client-architecture = 00:00 {
                filename "/undionly.kpxe";
        } else {
                filename "/ipxe.efi";
        }
}
This is the cunning bit. You see there's a problem with PXE chainloaidng iPXE: PXE boots the network, asks for a filename, downloads it and runs it. iPXE does the same - boots the network, asks for a filename, downloads it and runs it. If there's no differentiation then the files that PXE and iPXE get are both the same, so PXE boots iPXE which then boots iPXE, which then boots iPXE.... etc for ever. There's a good page in the iPXE documentation about breaking that loop, which is where I found the magic you see above. It's well worth a read as it also contains information for other methods and DHCP servers.
So with luck we have now configured our DHCP server to allow PXE
booting and load iPXE. Now to actually get that iPXE image on to the
target. Enter tftp:
5. Set up TFTP to share the iPXE boot image
TFTP stands for Trivial File Transfer Protocol, and it is exactly that. A very basic system whereby a system can say "Give me this file" and the server either says "No, go away" or "Here's the file....". The requestor has to first know the full path of the file it wants, which is what DHCP has handed to it through the filename option above.
First, though, we need to set up a TFTP server. That usually just
means installing a suitable package from your package manager and
starting a service. The most popular server is the "tftp-hpa" server and
is available on pretty much all distros. You may start by looking at this howto for Ubuntu.
Then it's just a matter of plopping the iPXE images into the tftp server folder and away we go. Those images, of course, are available from the iPXE website for download:
https://boot.ipxe.org/undionly.kpxe
https://boot.ipxe.org/ipxe.efi
Of course, tftp is only half the problem. iPXE gets its
configuration script through HTTP, so you're going to need to install
and configure apache or some other web server software on your server to
serve that file out. There's no shortage of tutorials available for
setting up web servers on Linux, so I'm sure you don't need me to hold
your hand through that. But what is that iPXE script? Well:
6. Create an iPXE boot script to mount the iSCSI target and boot from it
iPXE has quite a few commands that it can execute, either as a script or interactively in the shell. It's an incredibly powerful system for network booting, and I have barely scratched the surface. The script file I am using is a mere handful of lines long:
#!ipxe
set initiator-iqn iqn.2023-02.uk.co.majenko.ipxe
sanhook --drive 0x80 iscsi:nas.majenko.co.uk:6:3260:0:iqn.2023-02.uk.co.majenko.nas
sanboot --drive 0x80
Three lines: 1. This is me, 2. Connect this drive, 3. Boot it.
It's possible to combine lines 2 and 3 into one and directly boot an iSCSI target URI, but I have found that causes problems if you want to have more than one drive connected.
The format of the iSCSI URI is "simple":
iscsi:<hostname or IP>:<protocol>:<port>:<lun>:<iqn>
The hosname or IP is that of your iSCSI server. The protocol is always 6. The port is 3260 (as specified in the "portal" of the target in targetcli), and the LUN is which LUN you want to connect to in the target. That would be 0 unless you have created other LUNs (which I will be doing later for other operating systems). IQN is of course the IQN of the target you are connecting to.
The drive "0x80" is the first BIOS hard drive, drive C. Drive D of course would be 0x81.
But there's no operating system on our drive yet, so we can't boot
it. And there seems to be no way of booting from floppy while the iSCSI
drive is connected. So we will have to have some form of workaround. For
that I used QEMU:
7. Use QEMU to install DOS into the iSCSI target
QEMU is a PC emulator for Linux that also happens to support iSCSI for its disks. So we can use that to boot a virtual PC whose C drive is the iSCSI drive and whose floppy drive is images of the MS-DOS 6.22 installation disks. Once qemu is installed on your system (check your package manager, it's sure to be there) you can run something along the lines of:
qemu-system-x86_64 \
    -iscsi initiator-name=iqn.2023-02.uk.co.majenko.ipxe \
    -drive format=raw,file=iscsi://nas.majenko.co.uk/iqn.2023-02.uk.co.majenko.nas/0,index=0,media=disk \
    -fda DOS-Disk1.img \
    -m 32 \
    -boot a
That should boot up with disk C attached to the iSCSI and start the
DOS installation in the normal way. You can now exit the installer and
use fdisk to partition the drive (you may need to use fdisk /mbr as well)
If everything above has worked you should be able now to install DOS. Tip: when it comes to wanting to change disks use CTRL-ALT-2 to switch to the console, then use
change floppy0 DOS-Disk2.img
to swap the disk images. CTRL-ALT-1 switches back to the main screen.
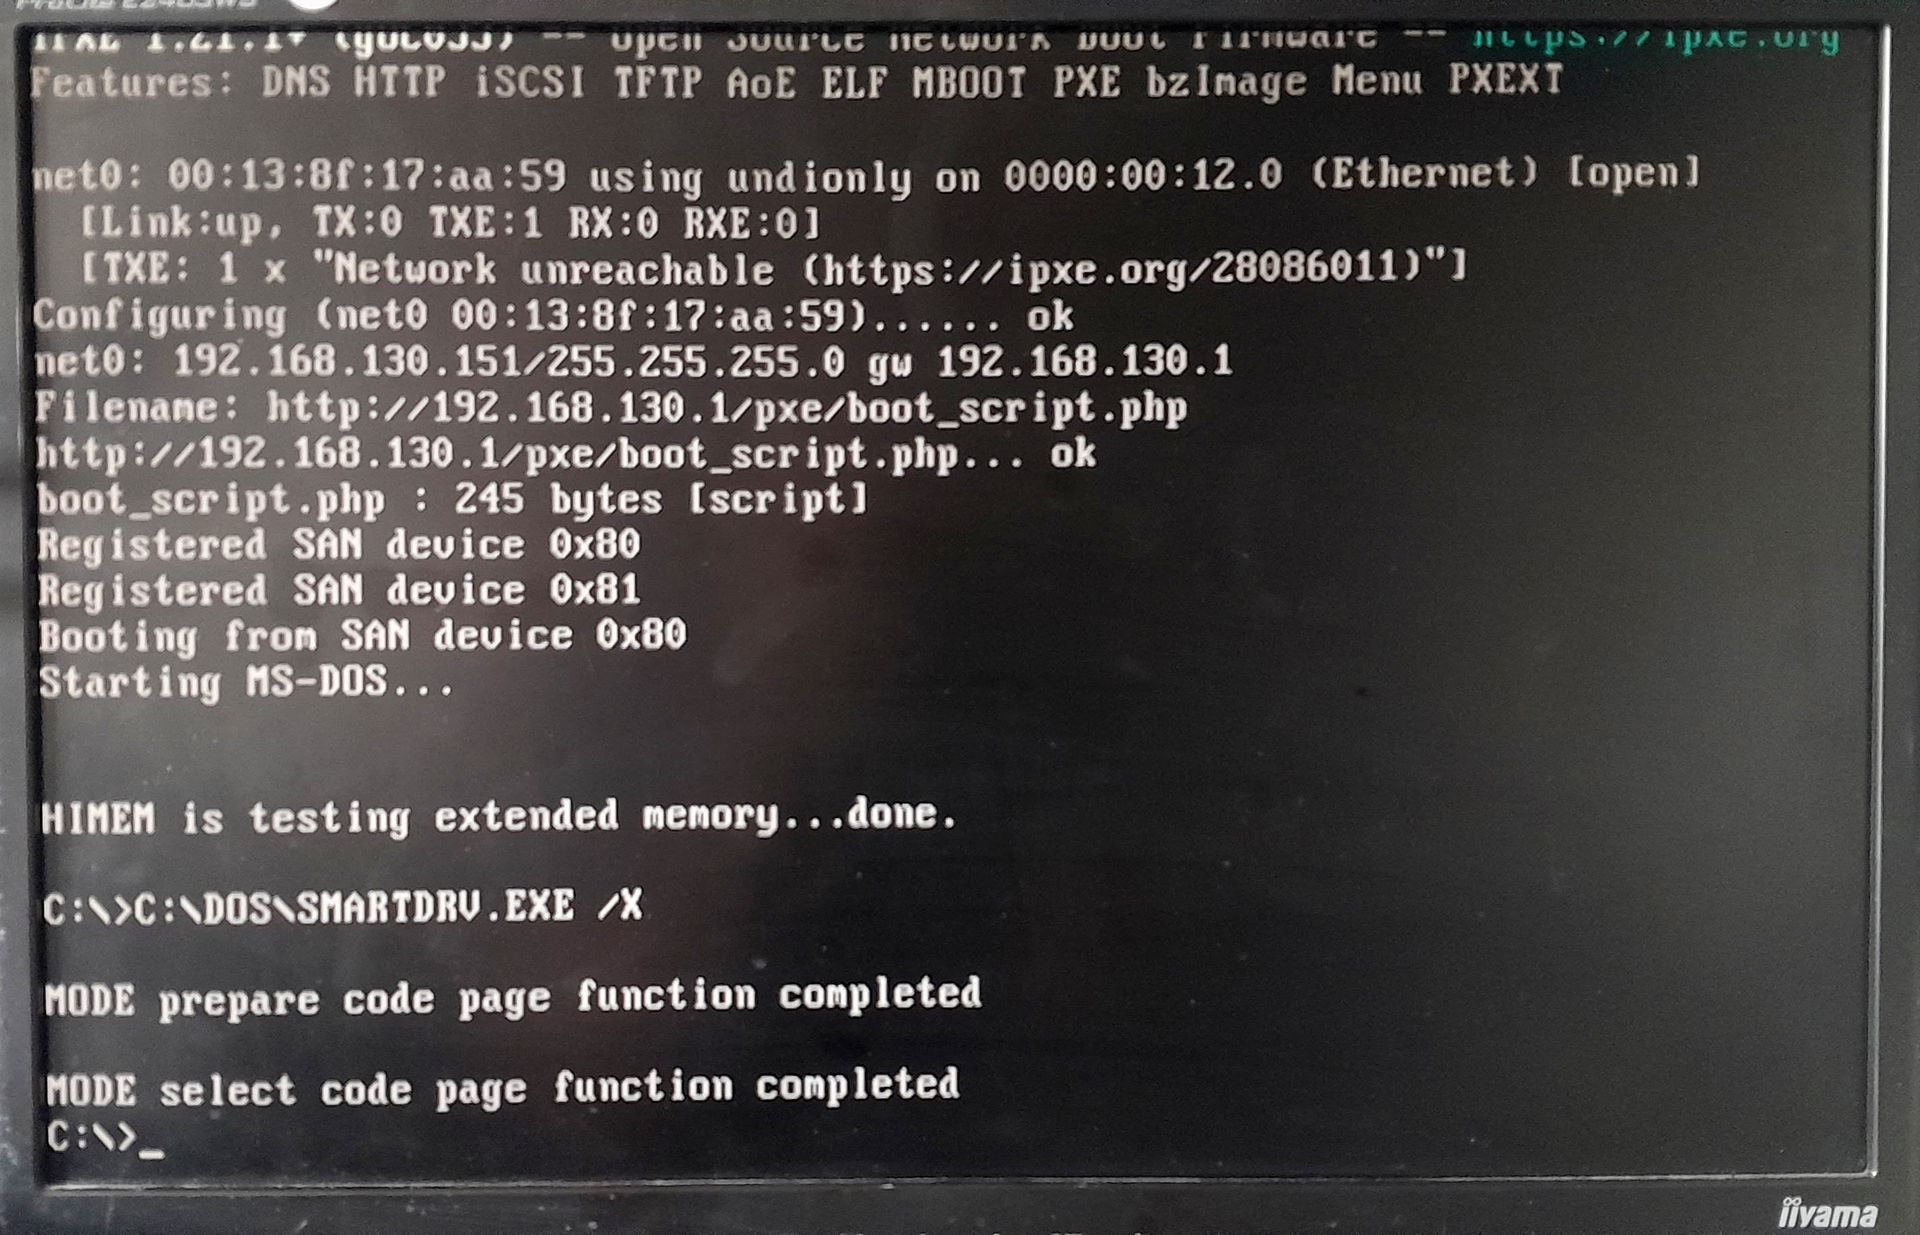
Once DOS is installed, exit qemu and pray...
8. Boot the testbench and hope