Logging data on an Arduino is very much a trivial every-day task. Connect an SD card, open a file, and start printing data to it.
For many people that is good enough. It results in nice easily readable (by us humans) data.
But it's not fast. It's not efficient. It's perfectly fine for things like logging temperature every hour, or barometric pressure every 5 minutes, etc. But when you have large amounts of data to store very rapidly you have to think a little differently.
I came across a situation recently where it was necessary to store lots of data values very rapidly and be able to read them back again at a similar speed. Now that could be done by writing those values to the file as text, maybe as a Comma Separated Values file (CSV), which is simple enough, but when it comes to reading that data back in on an Arduino things get decidedly complex. And complex means lots of code and large processing overheads.
So what is needed is a way of storing the data in such a way that it is trivial to read it back in. So for this I am going to give you two small phrases that sum everything up quite neatly:
- Human Readable
- Machine Readable
That describes two types of file. Human Readable files are things like text files, CSV files, etc. You can open them in a simple text editor and you understand what they are. It's just text. However a computer has a hard time understanding them. The opposite end of the spectrum is Machine Readable files. These can't be understood by a (normal) human being. You open them in a text editor and all you see is gibberish. It takes a special computer program to interpret them and display a representation of that data for a human to make head or tail of it. A good example is a graphics file - say a PNG file. Here is a PNG file opened in GEdit on Linux:
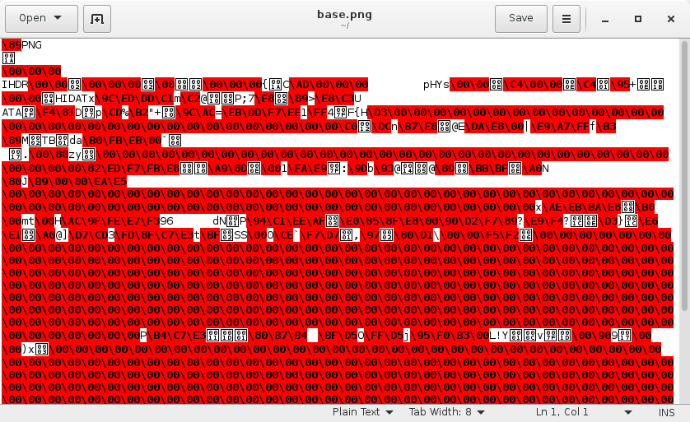
As you can see it's just nonsense. However open it with a graphics program and that program reads the file and uses it to create a picture you can see.
Such data is said to be Binary. It is important to note, of course, that binary contains text. That is, text files are just a subset of binary files. In a binary file each entry (byte) can contain a value between 0 and 255. Text files just map the letters we all know and love to numbers within that range of 0-255. So there is absolutely no difference between a text and binary file - its is just that a binary file can contain more data outside the range of human understanding. For instance in the PNG file above you can see the word "PNG", and "HIDAT" and other letters and numbers besides the stuff that you can't understand. So a binary file that contains only bytes in the human readable range (also known as ASCII values - the American Standard Code for Information Interchange) we choose to call a text file.
So how does this help us store data more efficiently on an Arduino? Well, simply by stepping away from the limiting factors of the human interpretation of data and using a purely machine readable file.
For this we are going to use a struct. In C a struct is a method of grouping different variables together into one single unit. You can think of it as a bit like an entry in a database, where you might have a name, address, town, postal code, all as different fields within it. In C those fields are variables, and the struct is the record. Let's take an example:
struct datastore {
    uint16_t adc1;
    uint16_t adc2;
    float voltage;
    float current;
};
There we have defined a structure that contains four different values within it. Each value has its own associated data type, just like normal variables. The whole structure itself is, as well, a new data type. You can make new variables from it, like:
struct datastore myData;
You now have a new variable called myData which itself has 4 sub-variables. You access those using a "." and the name:
myData.adc1 = analogRead(0);
myData.adc2 = analogRead(1);
myData.voltage = myData.adc1/1024.0*5.0;
myData.current = myData.adc2/10000.0*23.4429;
It's a useful technique in its own right for grouping different variables together that are related, but it's real power comes when you get under the hood and look at what is actually happening. Not only are the sub-variables grouped together within an umbrella name like that, but they are also grouped together in memory. And in a very specific way as well. The order they are specified in the structure is the order they are held in memory. For instance the struct above might look like this in memory:

Each square is one byte in memory. As you can see the uint16_t values (same as an unsigned int on the Arduino - I'll cover why using uint16_t and not unsigned int is important a little later) use two bytes, and the float values use 4 bytes each. That gives a total of 12 bytes. And of course it is perfectly possible to access those raw bytes of data should you wish to.
And we wish to - although not directly.
There is another very useful function in C called sizeof(var). That tells you how big variables are. For instance it would return 2 for a uint16_t, 4 for a float, etc. For our struct it would return 12.
So now what if we were to write those 12 raw bytes direct to the SD card instead of a textual representation of the numbers? We would end up with a file that was 12 bytes long. Write it twice and we would have a file that was 24 bytes long. Three times and it would be 36 bytes long.
The SD library on the Arduino supports that kind of writing perfectly well. You don't have to do anything special when creating or opening the file. All the magic happens when you tell it to just write a bunch of bytes instead of text:
myFile.write((const uint8_t *)&myData, sizeof(myData));
Yes, I know, that looks a little cryptic, so I'll break it down for you so you can see what is going on here.
&myData gets the address in memory where the data is stored. It is intrinsically a struct datastore * type. The write function doesn't like that type, so we need to change it. That is called casting, and we want to cast it to an unsigned byte pointer type, so prepend it with:
(const uint8_t *) &myData
The write function now sees it as an array of bytes. Clever, eh? Along side that we need to tell the write function how many bytes to write, and for that we can use the handy sizeof() function I mentioned before.
So let's roll that all into a complete example:
#include <SPI.h>
#include <SD.h>

const int chipSelect = 4;
File dataFile;

struct datastore {
    uint16_t adc1;
    uint16_t adc2;
    float voltage;
    float current;
};

void setup() {
    Serial.begin(9600);
    Serial.print("Initializing SD card...");
    pinMode(10, OUTPUT);

    if (!SD.begin(chipSelect)) {
        Serial.println("Card failed, or not present");
        return;
    }

    Serial.println("card initialized.");
    dataFile = SD.open("datalog.dat", FILE_WRITE);
}

void loop() {
    struct datastore myData;
    myData.adc1 = analogRead(0);
    myData.adc2 = analogRead(1);
    myData.voltage = myData.adc1 / 1023.0 * 5.0;
    myData.current = myData.adc2 / 10000.0 * 23.4429;
    dataFile.write((const uint8_t *)&myData, sizeof(myData));
    delay(50);
}
So now we are filling our SD card with raw binary data. But what can we do with it? We can't look at it, it will just be meaningless to us. So we need the Arduino to read it for us. And that is just as simple. There is a "read" equivalent to the "write" function we used above where we can tell it to read bytes into an array - and that array can be our struct cast as before:
myFile.read((uint8_t *)&myData, sizeof(myData));
That will read the 12 bytes from the SD card and reconstruct your structure for you, all magically and without you needing to do any interpreting of numbers or symbols. So we can take the example we already have and change it into a reading example very very simply:
#include <SPI.h>
#include <SD.h>

const int chipSelect = 4;
File dataFile;

struct datastore {
    uint16_t adc1;
    uint16_t adc2;
    float voltage;
    float current;
};

void setup() {
    Serial.begin(9600);
    Serial.print("Initializing SD card...");
    pinMode(10, OUTPUT);

    if (!SD.begin(chipSelect)) {
        Serial.println("Card failed, or not present");
        return;
    }

    Serial.println("card initialized.");
    dataFile = SD.open("datalog.dat", FILE_READ);
}

void loop() {
    if (dataFile.available()) {
        struct datastore myData;
        dataFile.read((uint8_t *)&myData, sizeof(myData));
        analogWrite(5, map(myData.adc1, 0, 1023, 0, 255));
        analogWrite(6, map(myData.adc2, 0, 1023, 0, 255));
        Serial.print(myData.voltage, 4);
        Serial.print(" ");
        Serial.println(myData.current, 4);
        delay(50);
    }
}
So simple. No need to try and understand the data, the Arduino already knows what it is.
There are a couple of gotchas though with this method.
- The data structure mustn't change, or you won't be able to read old data. It relies on the struct always being the same size and with the same variables in it. If you suspect that you may want to add more variables to the structure at a later date you should reserve room for them in the structure right from the start.
- Different chips, boards and computers treat different variables in different ways. For instance on an Arduino Uno an int is 2 bytes, but on a Due it's 4 bytes. That is why it is important to use things like uint16_t instead of unsigned int - it tells the system precisely how big a variable to use and all systems will then use the same size.
- Carrying on from 2 is the problem of endianness. Not only do different systems have different sizes for different variables, but there are a number of ways of arranging them in memory - for instance the uint16_t has two bytes, but which byte is which? There are two common endiannesses - big-endian and little-endian, and making sure that you convert between them on different systems is vital or your data will just come out as nonsense. For instance, take the Arduino Yun. The ATMega32U4 chip is little-endian. That means that in a 2-byte variable like the uint16_t it stores the least significant byte first. The Linux portion, though, happens to be big-endian. That means it stores the most significant byte first. So to read the data written by the ATMega32U4 on the Linux side you will have to manually swap the bytes around when reading from the structure.